(Disclaimer- this is not my original idea; I just took the basic design and made it better.)
(Para instruções em Português, incluindo medidas métricas, por favor contacte a Autora)
General Considerations
- About the Tulle
- try to get the softest nylon tulle available, with a small diamond mesh; hexagon mesh is stiff and scratchy.
- I worked with 54" wide (or thereabouts) tulle, which comes folded in half in a bolt. You can also get 'tulle on a spool' and just cut it to length.
- when you use 2 colors to make a tutu, you achieve a full, rich look; the main color will be predominant and the secondary color will add dimension.
- cream and white will generally work with other colors (cream/pink, white/blue, etc); you can also use 2 shades of the same color for a monochromatic tutu.
- tulle comes in regular ($0.97/yard*) and sparkle ($1.27/yard*); sparkle is really pretty (looks like pixie dust).
- before you start, precut all the tulle- it will make the job easier.
- after trying different ways of cutting the tulle (very unsuccessfully), we had the best results by bunching it between your hands and then cutting (please refer to instructions for photo).
- About the Waist
- if you have some ILP tutorials on no-sew tutus, these instructions use elastic for the waist- please don't try it this way! (we started it like this and soon discovered that the elastic lost strength during the tying process).
- when you use satin ribbon the tutu looks prettier in the back, and you'll also be able to add tulle as your daughter grows, since the skirt is open and ties in the back.
- About the Size
- R. is almost 9 years old and I wanted a long, full-bodied tutu for her.
- I first bought 6 yards of cream and 12 of pink; towards the end we ran out and I bought 2 and 4 more, for a total of 8 yards of cream and 16 of pink (yes, 24 yards of tulle).
- our tutu has a waist if 28" and is about 25" long (the length is not uniform for added variety); for a 4-5 year old girl I would probably start with 10-12 yards of tulle and for a toddler maybe 4 yards, depending on size and length (you can always add more if it's not enough).
- the length of the tutu is the width of the tulle folded in half (please adjust this general measurement for the strips of the tulle according to the size of your girl).
(* prices at my local WM)
Materials and Instructions
- a good pair of scissors
- tulle (yardage and color needed for your particular project)
- 1 spool of 5/8" satin ribbon in coordinating color
- an assistant (preferrably your daughter since she'll be the one wearing the tutu)
- Cut the tulle in strips by bunching sections between your assistant's hands; width of strips can be 3-4" (don't worry about being precise; variation will add interest to the tutu).

- Mark the center point of your satin ribbon with a knot over the belly button, and then tie it in the back; decide how long you want the ribbon to be (we used about 8-9 ft).


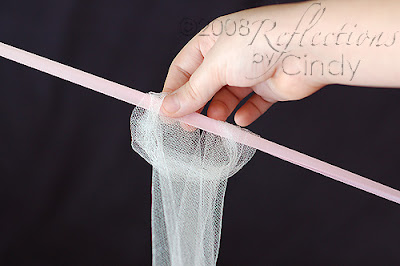
- Tie your tulle strips to the ribbon with a loop and pull method (the tulle will lie better this way); we used a 2 pinks to 1 cream pattern (make sure your knots are tight together). You'll need your assistant to keep ribbon taught while you tie the tulle.

Close up of tulle tied:


- Keep adding tulle to fill the waist of your tutu; when done, tie knots in the ribbon at each end to prevent tulle from slipping.
View of tutu tied in the back:

Please refer to the post "Pink Tutu" for more photos of how it looks.
Edited to say- it takes about 1- 1 1/2 hours to make, with cutting and tying included. With a good assistant, it may take less.
Happy Tutu Making!
-If you have any questions (meaning, if my instructions were not very clear), please don't hesitate to contact me.
(I wish to thank my assistants in this production, M. and R., without whom it wouldn't have been possible- thank you!)


1 comment:
thanks so much for this cindy!
Post a Comment